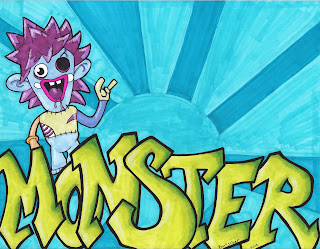
This is my favorite drawing for this challenge. I just like everything about it. Markers again and done for one of my students.
Thursday, June 7, 2012
Wednesday, June 6, 2012
Graffiti Challenge 65 of 200
Moving right along. Markers again. I love learning to use new materials and markers have been fun. I have learned a lot about blending colors and what the limitations are of this media. I am also learning which markers work the best for me and look I want. This challenge has been a great learning experience for me, which is exactly why I started doing it!
Monday, May 28, 2012
Graffiti Challenge #64
Number 64 of the challenge I set for myself to draw 200 graffiti style pictures. Done with markers for a classmate of my sons. He said she loved it and he was very proud to give it to her.
Friday, March 9, 2012
Graffiti Challenge #63
Wednesday, February 8, 2012
Graffiti Challenge #62
Last year I came across a documentary on graffiti while looking for something to watch on Netflix. At that time I was struggling with making a connection with my middle school students during their time in the art room. I watched the documentary, and to my surprise, became inspired by the colors and lines. I started working on my own graffiti style drawings and turned what I had learned into an art lesson for my middle school students. I have continued working on my graffiti skills (only on paper) and have learned so much with this process. At the end of last year I decided to challenge myself to do 200 graffiti drawings. The purpose of doing this is to demonstrate to students how much of a difference practice makes. This year I started doing an art battle with my students where I post a different word every couple of weeks and they draw that word. I also do a drawing of the word and give it to the winner of the battle as part of their prize. They also get to pick out some art supplies like sharpie markers, mechanical pencils, click erasers, etc. For this drawing I used Prismacolor and Touch markers. I prefer the touch markers at this point.

Sunday, February 5, 2012
Abstract Watercolor Painting Lesson
I got the idea for this lesson from a pin on Pinterest and thought I would do it with my eighth grade students for their first art project with me this year. It looked easy to do and I thought it would be a good way to break the ice and get them warmed up with a low-pressure project.
Supplies:
12x18 white drawing paper
black ink
straw
watercolor paints & brushes
Step 1: Place drops of ink on your paper (one at a time) and blow it around the paper using a straw. The amount of air you push through the straw will determine how your ink moves around. I tried to vary my air pressure as much as possible. Allow the ink to dry before moving onto the next step.
Step 2: Using watercolors, add color to the white parts of the paper. I used my ink splots as guides for some of my colors and for others I let them stop randomly. The purpose for me doing this lesson with my students is to let them experiment with watercolor paints. I will show them different painting techniques prior to them starting with the watercolors and then have them try out the different techniques.
Step 3: Continue adding colors until your paper is filled, leaving no white spaces. I decided to use only a few different colors for my painting. I think I will encourage my students to pick a few colors but will allow them to use as many as they want since the purpose is to have them experiment.
Overall I'm happy with the way the project example turned out. However, I think it would have looked better if I used liquid watercolors instead, so the colors would be more intense.
Labels:
abstract art,
art lesson,
middle school,
watercolor
Monday, January 30, 2012
Imperfection Zentangle Journal Page
This challenge was posted over at Zentangles and Stuff and I thought it looked like fun. It was very simple to do, yet very much a challenge for me. The challenge was to free-hand draw a tic-tac-toe board in a journal page. Then, fill in 4 of the squares with writings and the rest of the squares with tangles. The challenging part for me was to journal about how imperfection has enhanced my life or art. I don't like imperfection, in my life or in my art. This is something I struggle with every day. When I work on my art I am usually very tense because I am always worried about making a mistake. The great thing about doing Zentangles is that you can relax and not worry so much about mistakes. When I did the writing sections I wrote more about not liking imperfections and less about how they have enhanced my life or art. I still really enjoyed doing this page and like the idea of using the grid for my page.
Sunday, January 29, 2012
Op Art Hands That POP!
I found this lesson while doing a Google image search for hands and thought I would try doing it with my current sixth grade art students. I think what attracted me most to the lesson is how simple it is to do. I mean what can be easier than tracing your hand? It also looks really cool when it is finished!
Step 1: Trace your hand lightly using a pencil. Do this step as lightly as possible because your original outline of your hand should not show when finished.
Step 2: Using a thin black Sharpie marker, start adding your lines. Start at the bottom of the page where your arm is and draw a curved line on the arm and then straight lines for the background. I had my students start by using a pencil for the first four or five lines until they got the hang of it, then using the marker to add the rest.
Tips:
Step 3: Continue adding lines and moving up the paper towards the top of the page. When doing the fingers I found it was easier to curve your lines in the opposite direction instead of trying to add straight lines there.
Step 4: The most difficult part of this project is ending the fingers. I found it somewhat difficult to find a way to get back to straight lines at the top once you get past the finger tips. Try to flatten out your line as much as possible so it no longer matches the curve of the fingers.
Step 5: Choose three colors, using a color scheme, and color between your black lines using colored pencils. I used a monochromatic color scheme for my example. I also gradated my colors to help the hand pop off the page. I finished by using a kneaded eraser to lift some of the color off the ridges of the fingers, hand, and arm.
I did this lesson with my sixth grade students but I think it could be done with younger students as well. Once I knew what mistakes were common, I could explain the lesson to them a little bit better and avoid those mistakes.
Step 1: Trace your hand lightly using a pencil. Do this step as lightly as possible because your original outline of your hand should not show when finished.
Tips:
- Make sure your curved lines line up with the straight line in the background.
- Do not trace your outline with the black marker.
- Place your lines close together. If there is too much space between your lines it will not look like the hand is popping off the page.
Step 5: Choose three colors, using a color scheme, and color between your black lines using colored pencils. I used a monochromatic color scheme for my example. I also gradated my colors to help the hand pop off the page. I finished by using a kneaded eraser to lift some of the color off the ridges of the fingers, hand, and arm.
I did this lesson with my sixth grade students but I think it could be done with younger students as well. Once I knew what mistakes were common, I could explain the lesson to them a little bit better and avoid those mistakes.
Friday, January 20, 2012
Getting Started with ATCs (Artist Trading Cards)
Tutorial has moved to a new home. Stop by artbyro.com for a new tutorial every week
Find the full tutorial here - https://artbyro.com/how-to-make-artist-trading-cards-atcs/
Find the full tutorial here - https://artbyro.com/how-to-make-artist-trading-cards-atcs/
Wednesday, January 18, 2012
Tuesday, January 17, 2012
Monday, January 16, 2012
Graffiti Challenge #59
Another drawing for one of my students. Did this one over winter break so I did a Grinch theme. Still working towards my goal of 200 drawings. My students are always very excited to receive their drawings. I do not tell them when I draw their names... I just do the drawing and give it to them the next time they come to art class. Again, Prismacolor and Touch markers.
Sunday, January 15, 2012
#58 - Graffiti challenge
Another drawing done for one of my students. I try something different with each drawing. I love this challenge because it pushes me to try new things and experiment with colors and designs. It has also given me the opportunity to work with markers, something I had never done prior to this challenge.
Saturday, January 14, 2012
#57 - Graffiti Challenge
Another drawing done for one of my kiddos at school. #57, my goal is to do 200 graffiti type drawings by the end of this year. Again done with Prismacolor and Touch markers.
Wednesday, January 4, 2012
Zentangle Give Away
The week #52 Zentangle challenge over at I am the diva is to give a zentangle to someone. I chose to pass this tile along to a co-worker who recently asked me what Zentangles were. The timing was perfect!!
Subscribe to:
Comments (Atom)


